Latest build 2.0.0b7 - 11 April 2025
This page will go over all the new features available in the Beta. You can get the latest builds at Access Arkio Beta See the latest reply to learn what’s new versus previous builds
AI camera
The AI camera replaces Arkio’s existing camera and allows users to make AI-enhanced snapshots of their current view in Arkio. The feature is designed to help with the ideation process and give designers more ideas on how something can look if it has more details and realism. This feature can be started by clicking the Camera sparkle icon on the main menu to open a gallery and prompt panel with further settings

The text input field allows you to create any simple or advanced prompt to enhance the image using the keyboard or voice detection (Mic icon) Arkio will extend your prompt based on the input. You can inspect and edit the enhanced prompt by clicking on the sparkle icon in the prompt field if you like to make further updates to the prompt.


To further customize your results you can add contextual info in the prompt like “misty weather”, “mountain backdrop” material specifications like “mid-century furniture” and “concrete with brass details” or render styles like “Ghibli style” and “van Gogh painting”. The more context you add the more detailed the generated image will be. You can experiment with adding city names as context, choosing an architectural or drawing style to follow, or describing the type and materials of objects to add details shown in the generated image.
Using the “Capture” button in vrless will create a snapshot from your current view and start generating an image based on your prompt. In VR you can “Start Capturing” and use the frame and trigger on your controller to make a new snapshot. Selecting "Stop capturing"will switch you back to other tools on that hand

Next to your prompt input and 4 default rendering styles, you can toggle randomize seed to randomize or reuse the visual style of your previous images for any new view using the active prompt. This way you can render a building from different angles with the same visual style.
You can also toggle between rendering an “Exterior” and “Interior” scene. To define more clearly if a render is intended outside or inside. By selecting the style toggles you can also switch between photorealistic renders, pencil sketches, color markers or architectural scale models.
You can add your own style requirements in the prompt to try out various other creative styles or properties. We love to see what you can come up with when using the possibilities of generative AI in Arkio. So share your findings with us on our beta community pages, mail or a call!
Highlights
- The non-vr camera got it’s own tool and viewfinder accessible via the new camera sparkle icon
- Create new images from the viewfinder in non-vr or in vr using the capture frame on your hand
- The resulting photo will then show in the viewfinder on the camera panel
- Clicking on the image in the gallery shows that image large in the viewfinder
- Clicking on the camera + icon will start making a new image
- Choose if you want an normal photo or AI-enhanced photo using the capture setting
- Interior/exterior, Render/sketch/color sketch/scale model style toggle
- Possible to add your own stylistic prompts like “lego model” or “studio Ghibli” to change the style of the image generated
- progress spinner when image generation or voice transcription operations are running
- View and edit the enhanced prompt by clicking on the Magic icon
- All photos (normal+AI) are automatically saved to your Arkio export/photos folder
- These photos can be exported to the Arkio cloud from mobile devices as normal photos
Known issues
- Image generation, microphone transcription, and prompt enhancements can fail depending on your network connection and device settings. Please try other networks and devices when experiencing issues with these services.
Frames and sticky notes
Normal or AI-enhanced photos can now be placed in the Arkio scene using the frame feature. (frame icon in the camera gallery) These frames can be used as trace paper to sketch and place sticky notes on to communicate ideas or issues with all participants. You can jump between these frames from the new views tab that lists all your viewpoints, frames and notes in the scenes. A new filter is added to the top of the views tab to make it easier to filter the elements you need.
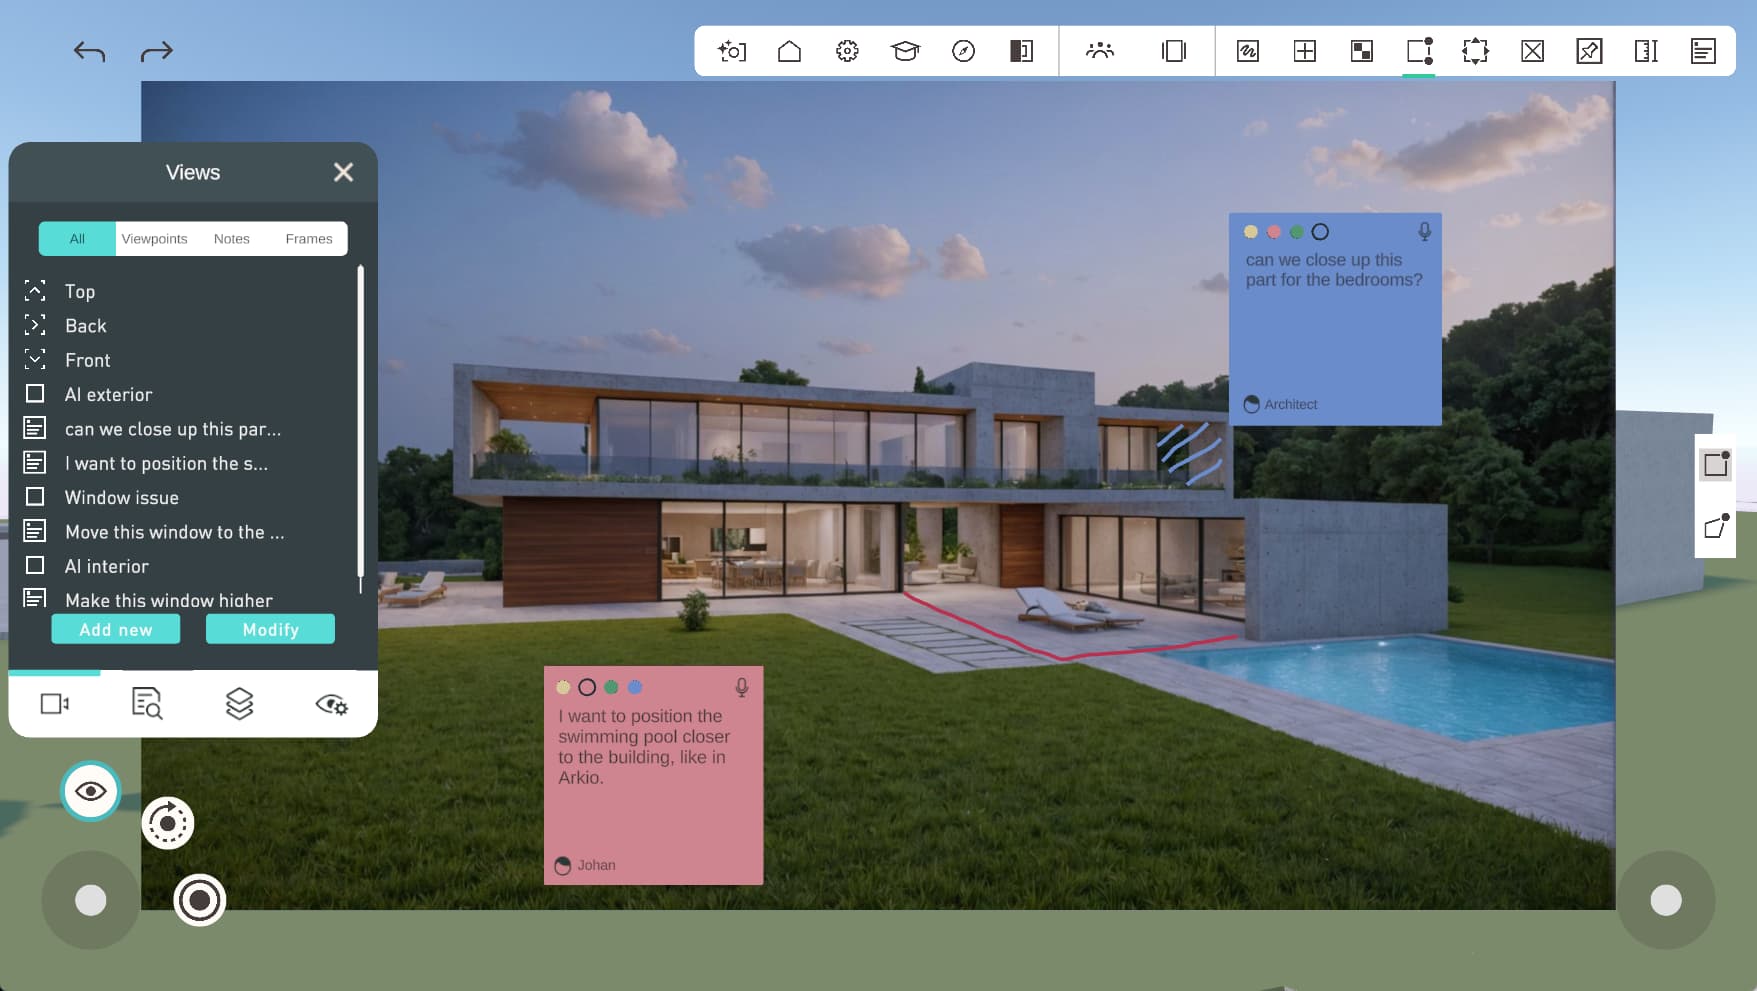
Frames and sticky notes are intended to share ideas and issues in your scene to be exported out of Arkio. We would love to hear your thoughts on how you would prefer to use these features in Arkio.
Arkio notes also got some updates making them easier to place and edit by clicking the text input field. You can use the new voice-to-text transcriptions from the top right microphone icon.


Highlights
- From the camera viewfinder, you can place previously captured photos and AI-enhanced photos in the scene as a frame
- You can automatically make frames for every new capture in the camera capture settings
- Frames can be drawn on with the sketch tool or sticky notes
- Frames save a camera position to go between all your frames in the scene
- Frames with AI images will automatically update to the latest generated AI image
- Improved note placement scale and movement
- Improved note interactive input fields
- Note voice-to-text transcription and device keyboard inputs
Known issues
- Frames/notes cannot be hidden/shown yet (we want users to hide/show frames and make them appear/disappear by distance)
- Photos/frames taken in MR will not (yet) include the passthrough view but this is something we hope to add when Meta opens their Passthrough API
- Movement of existing notes in VR needs to be improved
- Exporting of notes is not possible yet (coming soon)
Import layer visibility
Arkio now has additional view settings for imported models from Rhino, Revit and Sketchup. In this first release, you can try this in the Revit sample scene that comes with Arkio. You can also import your 3D models from Rhino/Revit/Sketchup with layers by using the latest plugin builds. The new layers tab can be found under the review eye icon on the bottom left corner in non-vr UI and the bottom menu of VR UI.

You can expand/collapse the Individual Revit categories or Rhino Layers and Sketchup Tags can be turned on and off. These settings are automatically saved in your Arkio scenes and shared with other meeting participants making it easier to present design options, and inspect certain elements and reduce geometry render budgets for large scenes.
You can also disable the full imported model by selecting the eye icon behind the main collapsable model and showing all or hiding all objects/layers in the scene.
Highlights
- Expand/collapse model layers and categories placed in the scene
- Enable/disable visibility of layers or full objects
- Saved in the scene and shared with other users in a meeting
- Show all or hide all layers
- Import your 3D models with layers using the latest plugin builds
Known issues
- Scrolling of the layer list does not work well yet
- Arkio props will also be added and organized in an expandable list
- Other objects will be added to the layers panel (eg Arkio sketches, sticky notes)
Scene management
Arkio’s file/scene management got a big update making it easier to manage a larger number of projects. Improved scene previews and history mode now show better using the new dynamic grid and row system for easier sorting and searching of files.

The dynamic sorting of scenes allows you to find the scenes you are looking for. This can be further filtered down using the alphabetical and date sorting or by using the new search feature that will show only the scenes that contain that name. (so you can filter your own favorites, projects and tags by naming your files.
You can rename your scenes by clicking on the title field in the panel and use the existing operations of creating a new scene, duplicating an existing scene (to start a new design option) or deleting your scenes. Renaming a scene will update that file dynamically and keep the history with the older names. If a scene with that name already exists the title text will turn gray to indicate another name must be used.


History mode now also shows previews and timestamps of all the history versions of your scene, these local backup are made every 2 minutes in single user or when being part of multiuser meetings so you can always go back in time. Since you can now restore back to any previous state of scene we no longer make duplicates of your scene when going into a meeting or when overwriting local scenes with the same name so this will keep your scene number under control.
When going into a new meeting your selected scene will automatically be shared with the active meeting participants. Meeting shared scenes are now indicated with a light blue plate color and an meeting icon on this plate. These scenes are only visible to the non-host meeting participants so it’s more easy to understand which scenes are shared and that only the meeting host has control over sharing new scenes in a meeting.


Scene sorting and filtering also works while inside a meeting the host can use these features to find the scene they are looking for and share other local scenes into a meeting (gray plate) The meeting host currently sees both local (gray plates) and meeting shared scenes (light blue plates). An additional toggle will be added for the host to only see the active meeting scenes similar to non-host users.
Highlights
- New dynamic grid and row sorting and name and date sorting modes.
- New search filtering of scene names
- Easier dynamic renaming of scenes
- Easier sharing of local scenes in a meeting
- Arkio geometry, props and custom imported 3D models now all show as a low-detail scene preview on the plates
- The previews of these scenes are updated when editing an active scene
- Per scene history mode snapshots are made every 2 minutes
- Prevent unnecessary duplication of Arkio scenes when going into meetings (history snapshot backup and can restore your scenes now)
Known issues
- Some scenes and history backup can fail to generate previews
- large imported models on the previews can have color artifacts
Arkio cloud scene sharing
Share an Arkio scene with anyone without needing to be in the same live Arkio meeting. This feature allows you to share your Arkio scene including all imported resources, frames and loaded geometry with your clients, collaborators or the Arkio team!

You can use this feature by making a Beta-compatible Arkio cloud group started from cloud.arkio.is/beta and connecting your Arkio beta client. You can then export your scene from the export tab in the scene viewer which will sync this scene between all your cloud devices.


From the Arkio cloud scenes tab (only visible after exporting a scene to the Arkio cloud) you can access all scenes that have been shared with your cloud group previously. From this page you can either delete, download or share individual scenes to other users.
From the Arkio cloud scenes tab (only visible after linking an Arkio Beta cloud group and exporting a scene) you can access scenes that have been shared with your cloud group previously. From this page you can either delete, download, or share individual scenes with other users.

When sharing scenes with others you can use a temporary 6-character scene-sharing code that can be filled in the Arkio home menu or you can copy a longer valid Arkio invite URL that generates a new scene-sharing code when refreshed.
pro tip: As you might have to switch between the Arkio cloud beta and the normal Arkio cloud you can best give them clear names and bookmark both copied URL’s to easily switch between them
Highlights
- Export scenes from the scene viewer in Arkio (cloud group needed)
- New Arkio cloud portal tab for scenes
- Send new sharing codes or URL links from this tab
- Load scenes using a share key in the Arkio home panel
Known issues
- The scenes tab and scene sharing still miss some features and UI changes on our cloud page
- Further tips and Arkio download instructions will be provided on the share URL
Presentation mode
Arkio meeting host can now activate presentation mode to keep the meeting central by preventing editing by other users and automatically gathering and muting other users in a meeting. This feature makes large meetings more organized and makes other collaboration features like the auto-gather mode on the wristband and colocation more predictable.


You can activate the new presentation mode from the meeting settings (top left gear on active meeting panel) Activating this mode will make all meeting participants viewer no matter their license. It will also activate auto-gather mode (see wristband) mute all current and new users.
Next to the meeting presentation mode we also added a new gather mode “Center” that puts (non-colocated) users in a meeting at the same position/rotation as the gatherer. This makes it easier to always look at the same thing from small interior spaces with your guest
Highlights
- New presentation mode toggle in meeting settings
- All users in the meeting except the host will be converted viewers instead of editors regardless of their Arkio license
- All users in the meeting except the host, users can still unmute themselves to talk
- Activate the auto-gather mode for the host (see wristband in VR) gathering all users when the host teleports/moves to a new position
- A new gather mode “Center” is added in meeting setting that will gather all users to the same position rotation of the gatherer.
- User can also activate view only mode in single user from the view settings tab
Archicad plugin
The Archicad plugin for Arkio is now available for Windows. This plugin allows Archicad users to export their 3D geometry from Archicad faster use the correct materials, scale and rotation and adds support for layers and BIM data similar to our other plugins.

You can install the plugins using the .bat installation scripts from our latest Windows builds. After the installations, you can run Archicad 27 or 28 to go to a 3D view that has the objects visible that you’d like to export and use the new “Arkio” menu to start the export. After your models are exported it will directly open the Arkio Beta PC client and process your files locally. You can place the files in the scene and start a meeting or connect your PC and mobile devices to the same Arkio cloud group to directly share the Archicad export with all your devices.

A Mac version of the Archicad plugin is also available but not included in our Windows builds and installer scripts. Contact us if you like to test the Mac Archicad plugin that works with the Mac client of Arkio. Archicad plugin exported gltf files can also be loaded in Arkio 1.9.1 by copying the files from \Documents\ArkioBeta\Import\Archicad to \Documents\Arkio\Import\Models but this will miss the new features like the layers and BIM data.
Known issues
- Some imported meshes loaded in Archicad as GDL elements can export with inverted normals. Updating these meshes to use outwards facing normal will fix this issue.
- Archicad Import is currently not added to this plugin. You can export to OBJ from Arkio and load that file to Archicad if you wish to bring your geometry back into Archicad.
New primitive round shapes
We’ve added new primitive shapes that give more creative freedom for round details in designs. These primitives are different from normal Arkio primitives as they are intended to be used as solid shapes. The inversed cylinder and half-cylinder shapes can be used to carve out round voids in solid shapes.

Primitive shapes can be created from solid faces or point and line features of other Arkio shapes and faces can be joined and shared so you can stretch more complex collections of primitives together.
Highlights
- Allows the creation of round shapes that can share edges/faces with other Arkio geometry
- Primitive shapes can be created from faces or line/points of other shapes in Arkio
- Primitive shapes can share faces with other Arkio solids and props to glue and move faces together
Known issues
- Most new primitives behave like solids and will not be able to carve voids into other primitives
- Bashing new primitives together will not glue their sides together like normal primitives
- The default orientation of primitive shapes is not defined well in most cases (rotating the primitives by hand might be needed)
- Texture UV mapping is not updating when scaling these primitives
Improved components
Arkio’s existing components now behave more reliably when drawing and editing components like doors windows and stairs. The system takes into account if a component is supposed to be hosted inside a wall or solid object and if it has a maximum size.

Highlights
- Easier to draw existing components: Stairs, curtain wall, Columns, Furniture
- Existing components have a minimum and maximum size
- Void components (doors and windows) can only be caved as void in existing solid shapes
Known issues
- Moving and editing some of these components after creation is unstable
- Not all components are modernized yet
- New components to be added (let us know if you have good ideas for some)
Improved wall drawing and editing
The wall tool and edit operations in Arkio get a usability overhaul to make drawing and editing of walls more similar to other 3D modeling tools. When drawing walls from the endpoint of other walls they will now join to smart wall chains that can later be edited using Arkio’s edit tools.

You can now use the orthogonal or freeform edit tool on wall faces and lines to make edits that only affect those wall features. Arkio tries to keep the remaining chain of the wall in the same position. We also added modeling stability improvements to the editing of shared faces so objects better stay in place while editing face/line/point features of combined shapes (eg when editing a stacked shape or objects with shared faces)
Highlights
- Wall segments can be created from the faces of primitives or endpoints of other walls to form editable wall chains
- Walls chains can now be edited more easily in Arkio (orthogonal and freeform mode)
- Walls chain segments stay in place while editing (where possible)
- Editing walls can be snapped to 90-degree angular references to other walls
- New editable walls are used in Meta’s room import
Known issues
- Some guides and snaps are missing
Ambient Occlusion
We optimized our rendering to allow additional rendering effects Quest like Ambient Occlusion which adds soft shadows around the edges so your scenes lighting look more realistic in Arkio. You can enable this setting from the view settings tab in the review panel

Highlights
- Improve shadows near object edges (will reduce performance)
- Effect can be turned on all devices from view settings (Setting stays on/off after restart)
Known issues
- The effect has some visual artifacts that are to be tweaked on Quest
- Performance can drop for large imported scenes and needs further profiling
Multimodal mode
When you have hand tracking enabled on your device you can now use one controller and hand tracking simultaneously by putting one of your controllers down. This will dynamically switch your controller to hand-tracking for pinch interacting with the Arkio scene, showing menus, and using other gestures like making a fist for panning and wrist up pointing for teleportation.

Gestures that require two-hand inputs like panning/scaling can now be done by combining your hand first gesture with the controller grip button. You can learn more about Arkio’s hand-tracking gestures from our in-app tutorial. Multimodal mode is being improved by Meta and still has issues on Quest 2 but it’s working well on Quest 3 and Quest 3S.
Highlights
- Use one controller and one hand simultaneously with Arkio’s modeling tools by puting one controller down
- Pick up and interact with geometry in the scene using one hand and one controller
- Mix hand/controller navigation gestures (eg make a fist and use grip to scale and pan)
Known issues
- Quest 2 does not support the multimodal mode
- Sometimes hands are being tracked unwantedly, disabling hand tracking on the device will avoid hand tracking and multimodal mode in Arkio
New table UI

- Accessible from 4 sides of the table, can be opened/closed by clicking on the 3 dots in VR
- Panel will change in size when scaling up/down
- Home panel and scene viewer are hosted to this panel
- visibility toggle for the green table surface to blend the model in your environment in passthrough god scale
New Meta avatars
We’re transitioning to the latest Meta avatars that have a more realistic look and feel these avatars are already supported in the Meta operating system and can be made and customized for usage in Arkio and other applications like Horizon Worlds.

- Create and view your new meta avatars in Arkio on PC and Quest
- Local avatar shows as mirror avatar in settings and in PC hybrid mode
- Multiuser avatars are supported between devices when both using the Beta version
Known issues
- Legs not moving
Other usability improvements
- Teleport enhancements
- Deselect the active tool by clicking the same tool icon again
- Single user viewer mode in view settings
- New Windows installation batch scripts for easier Beta and plugin installations
- Increased stability for importing heavy and large distanced models
- New setting to import models in the scene with a X-Y-Z up axis
Known issues
- Import XYZ Rotation is not following the correct up direction for some axis
- Flickering shadows can appear on PC VR and Quest builds


